说明
本文为笔者React学习记录,也可作为新手学习React的参考,学习资源为慕课网Dell老师的React视频,地址:React16.4开发简书项目 从零基础入门到实战。
本文通过完成TodoList,学习React从下载安装到基本使用所涉及的知识点,包括:
- 环境搭建
- 基础语法
- 原理进阶
- 动画
- Redux
- Redux进阶
涉及技术点包括:create-react-app、组件、JSX、开发调试工具、虚拟DOM、生命周期、React-transition-group、Redux、Antd、UI组件/容器组件、无状态组件、redux-thunk、redux-saga、Styled-components、Immutable.js、redux-immutable、axios。
环境搭建
React环境使用脚手架工具搭建(引入.js文件的方式就不考虑了),这里使用官方推荐的create-react-app脚手架工具(前提:安装好满足版本要求的node)。使用方式为在终端执行(注意安装路径):
$: npx create-react-app my-app  # 创建名为my-app的项目
$: cd my-app  # 进入项目目录
$: npm start  # 启动项目
启动后根据日志中显示地址(默认:http://localhost:3000)即可访问React服务首页。
初始化项目结构
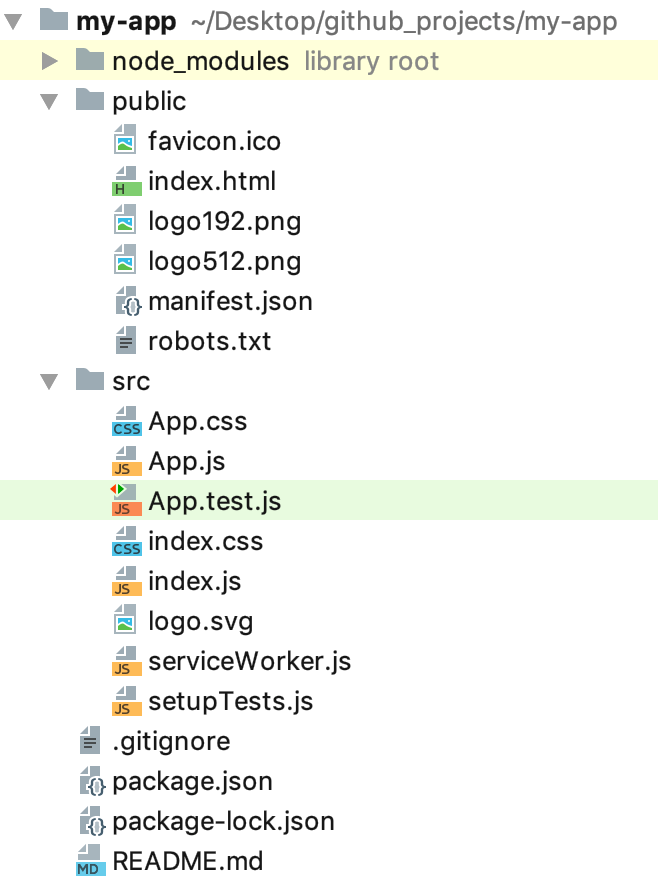
- node-modules:使用脚手架工具构建项目依赖包,一般不操作;
- public:项目入口或公共资源文件;
- public/favicon.ico:网站图标;
- public/index.html:项目首页;
- public/manifest.json:同下面src/serviceWirker.js提供类似于本地缓存的功能;
- public/robots.txt:爬虫协议相关;
- src:存放项目源码;
- src/App.js、App.css:组件和组件样式文件;
- src/App.test.js:同下面setupTests.js(自动化)测试相关;
- src/index.js:项目入口文件;
- src/index.css:首页样式;
- src/logo.svg:Logo;
- .gitignore:git管理时的ignore文件;
- package.json:脚手架构建项目配置文件,一般不操作;
- package-lock.json:脚手架构建项目对应文件,不操作;
- README.md:readme文件,可自行编辑;
组件
组件是组成React页面的基本元素。React通过ReactDOM渲染组件到页面。目前React定义组件的方式主要有两种:函数式定义的无状态组件 和 继承React.Component定义的组件。
// 函数式无状态组件
function MyComponent (props) {
  return <div>Hello {props.name}</div>
}

// 挂载组件到页面元素
ReactDOM.render(<MyCompont name="React" />, mountNode)
// 继承React.Component定义组件
class MyComponent extends React.Component {
  render() {
    return (
    	<div>Hello React!</div>
    )
  }
}
ReactDOM.render(<MyCompont name="React" />, mountNode)
React引入js文件可以省略.js后缀,因此引入组件直接import 组件名即可。需要注意的是,组件首字母必须大写,引入时直接使用组件名,使用时以标签的形式使用。
JSX
React可以以类似于html标签的形式使用组件,这种在js代码里使用html标签的语法叫JSX语法。JSX语法编译依赖React,因此在使用JSX语法的页面头部,一定要有import React from 'react';。
JSX注释方式:
{/*里面写注释文字*/}
或者
{
// 注意这种方式括号不能放在同一行,否者后括号会被注释掉导致失效
}
JSX定义类名:JSX中给元素添加类名时使用className='**'而不是class="**"。
JSX防止转义:JSX为防止内容在页面展示时被转义,使用dangerouslySetInnerHTML=的方式。
JSX定义lable标签for属性:JSX中,对lable的for属性,使用htmlFor代替。
TODOLIST
通过完成TodoList来熟悉和学习React的基础概念和语法。
- 创建一个名为TodoList的项目:
npx create-react-app react-todolist; - 删除public路径下除index.html外其余文件,删除src路径下除index.js外其余文件,精简index.html和index.js文件如下:
<!DOCTYPE html>
<html lang="en">
  <head>
    <meta charset="utf-8" />
    <link rel="icon" href="%PUBLIC_URL%/favicon.ico" />
    <meta name="viewport" content="width=device-width, initial-scale=1" />
    <meta name="theme-color" content="#000000" />
    <meta
      name="description"
      content="Web site created using create-react-app"
    />
    <link rel="apple-touch-icon" href="%PUBLIC_URL%/logo192.png" />
    <title>TodoList</title>
  </head>
  <body>
    <noscript>You need to enable JavaScript to run this app.</noscript>
    <div id="root"></div>
  </body>
</html>
import React from 'react';
import ReactDOM from 'react-dom';

ReactDOM.render(<TodoList />, document.getElementById('root'));  // TodoList报错,因为此时并没有该组件
- 在src下新建Todolist.js,并在index.js中引入:
import React, { Component } from 'react';

class TodoList extends Component {
    render() {
        return (
            <div>TodoList</div>
        )
    }
}

export default TodoList;
import React from 'react';
import ReactDOM from 'react-dom';
import TodoList from './TodoList'

ReactDOM.render(<TodoList />, document.getElementById('root'));
此时通过npm start启动项目,在浏览器输入http://localhost:3000/即可看到Todolist字符串显示到网页上,打开控制台没有报错,项目正常。
- 完善TodoList.js里面页面内容:
import React, { Component } from 'react';

class TodoList extends Component {
    render() {
        return (
            // return最外层必须只有一个元素
            <div>
                <input type="text"/>
                <button>提交</button>
                <ul>
                    <li>学习React</li>
                    <li>学习Spark</li>
                    <li>学习Python</li>
                </ul>
            </div>
        )
    }
}

export default TodoList;
如果不想在元素中最外层包一个div,可以使用React16提供的占位符Fragment:
import React, {Component, Fragment} from 'react';

class TodoList extends Component {
    render() {
        return (
            // return最外层必须只有一个元素
            <Fragment>
                <input type="text"/>
                <button>提交</button>
                <ul>
                    <li>学习React</li>
                    <li>学习Spark</li>
                    <li>学习Python</li>
                </ul>
            </Fragment>
        )
    }
}

export default TodoList;
此时查看页面元素,root节点下直接元素有input、button和ul,不再有外层的div。
-
与原生js操作dom改变页面不同,React作为一个响应式的框架,通过数据来驱动页面的加载和更新,因此在React中需要关注的是数据层的操作。
TodoList案例中,设计到两个数据,即input输入值和下面展示的列表项。修改代码如下:
import React, {Component, Fragment} from 'react';

class TodoList extends Component {
    // 使用构造方法定义(初始化)数据,数据存放于state中。super(props)为固定写法。
    constructor(props) {
        super(props);
        this.state = {
            inputValue: '',
            list: []
        }
    }
    render() {
        return (
            <Fragment>
                {/*
                    jsx中使用js表达式或变量时,使用{}包含
                    input的value值与数据inputValue绑定,此后修改数据来控制input里显示内容
                */}
                <input value={this.state.inputValue} type="text"/>
                <button>提交</button>
                <ul>
                    <li>学习React</li>
                    <li>学习Spark</li>
                    <li>学习Python</li>
                </ul>
            </Fragment>
        )
    }
}

export default TodoList;
此时页面中的input框无法输入值,原因为input中值只由数据inputValue控制。打开控制台也可看到警告说明:
Warning: Failed prop type: You provided a `value` prop to a form field without an `onChange` handler. This will render a read-only field. If the field should be mutable use `defaultValue`. Otherwise, set either `onChange` or `readOnly`.
- 为使input框可以输入内容,对input添加onchange事件:
import React, {Component, Fragment} from 'react';

class TodoList extends Component {
    constructor(props) {
        super(props);
        this.state = {
            inputValue: '',
            list: []
        }
    }
    render() {
        return (
            <Fragment>
                {/*
                    React添加事件监听,使用驼峰命名,onChange的C大写
                    input框数据改变时,调用handleInputCHange方法
                */}
                <input
                    value={this.state.inputValue}
                    // onChange={this.handleInputChange}
                    // 为使handleInputChange方法内使用this指向todolist组件本身,
                    // 需要绑定this。否则方法里使用this为undefined。
                    onChange={this.handleInputChange.bind(this)}
                />
                <button>提交</button>
                <ul>
                    <li>学习React</li>
                    <li>学习Spark</li>
                    <li>学习Python</li>
                </ul>
            </Fragment>
        )
    }
    // 定义handleInputChange方法,接受一个event对象,其中有target属性表示input节点。
    handleInputChange(e) {
        // 不能直接这样修改数据。
        // this.state.inputValue = e.target.value;
        // 修改数据使用setState方法(参数为对象)。
        this.setState({
            inputValue: e.target.value,
        })
    }
}

export default TodoList;
此时input框可以正常输入文本。
- 此时展示项仍为写死的假数据,修改为通过数据展示:
import React, {Component, Fragment} from 'react';

class TodoList extends Component {
    constructor(props) {
        super(props);
        this.state = {
            inputValue: '',
            list: []
        }
    }
    render() {
        return (
            <Fragment>
                <input
                    value={this.state.inputValue}
                    onChange={this.handleInputChange.bind(this)}
                />
                <button>提交</button>
                <ul>
                    {/*
                        使用list的map方法遍历数组。方法里接受回调函数,回调函数接受两个参数:
                        数据项和下标。
                        回调函数返回li包含的每一项的内容。
                    */}
                    {
                        this.state.list.map((item, index)=>{
                            return <li>{item}</li>
                        })
                    }
                </ul>
            </Fragment>
        )
    }
    handleInputChange(e) {
        this.setState({
            inputValue: e.target.value,
        })
    }
}

export default TodoList;
这样页面中展示项就由数据list决定。
- 为使点击提交时可以将文本框输入的内容添加到列表展示,绑定点击事件:
import React, {Component, Fragment} from 'react';

class TodoList extends Component {
    constructor(props) {
        super(props);
        this.state = {
            inputValue: '',
            list: []
        }
    }
    render() {
        return (
            <Fragment>
                <input
                    value={this.state.inputValue}
                    onChange={this.handleInputChange.bind(this)}
                />
                <button
                    onClick={this.handleBtnClick.bind(this)}
                >
                    提交
                </button>
                <ul>
                    {
                        this.state.list.map((item, index)=>{
                            return <li>{item}</li>
                        })
                    }
                </ul>
            </Fragment>
        )
    }
    handleInputChange(e) {
        this.setState({
            inputValue: e.target.value,
        })
    }

    handleBtnClick() {
        this.setState({
            // ...list展开运算法,把list内容展开生成一个新的数组
            list: [...this.state.list, this.state.inputValue],
            inputValue: ''  // 添加数据后清空input内容
        })
    }
}

export default TodoList;
此时已经可以正常使用新增功能。但打开控制台操作时可以看到会有如下警告:
Warning: Each child in a list should have a unique "key" prop.
原因为React作循环渲染时,建议给循环项增加key属性,作为每一项的标识。实际使用key一般使用后台数据的ID,这里暂时使用index,实际项目不建议使用index作为key,原因为列表新增删除时同一项数据的index会发生变化。
...
this.state.list.map((item, index)=>{
    return <li key={index}>{item}</li>
})
...
- 为可以在点击展示项时把对应数据删除,给列表项添加点击事件:
import React, {Component, Fragment} from 'react';

class TodoList extends Component {
    constructor(props) {
        super(props);
        this.state = {
            inputValue: '',
            list: []
        }
    }
    render() {
        return (
            <Fragment>
                <input
                    value={this.state.inputValue}
                    onChange={this.handleInputChange.bind(this)}
                />
                <button
                    onClick={this.handleBtnClick.bind(this)}
                >
                    提交
                </button>
                <ul>
                    {
                        this.state.list.map((item, index)=>{
                            // return 单行时可以不实用(),多行时要以()括起来
                            return (
                                <li
                                    key={index}
                                    // 为点击时删除对应项,需要把下标传递过去。直接在bind(this)后增加index即可
                                    onClick={this.handleItemDelete.bind(this, index)}
                                >
                                    {item}
                                </li>
                            )
                        })
                    }
                </ul>
            </Fragment>
        )
    }
    handleInputChange(e) {
        this.setState({
            inputValue: e.target.value,
        })
    }

    handleBtnClick() {
        this.setState({
            list: [...this.state.list, this.state.inputValue],
            inputValue: '',
        })
    }

    handleItemDelete(index) {
        // 注意:React中有Immutable概念,对于列表对象等数据,建议不要修改原数据。
        const list = [...this.state.list];
        list.splice(index, 1);
        this.setState({
            list: list
        })
    }
}

export default TodoList;
至此一个简单的TodoList功能就完成了。
组件拆分和传值
通过对上面TodoList功能进行组件拆分来熟悉组件化思维和学习组件间传值。这里我们可以将每个列表项作为一个组件来拆分。
- 在src路径下新增TodoItem.js文件:
import React, { Component } from 'react';

class TodoItem extends Component {
    render() {
        return (
            <li>todoitem</li>
        )
    }
}

export default TodoItem;
在TodoList.js中引入TodoItem:
import React, {Component, Fragment} from 'react';
import TodoItem from './TodoItem';

class TodoList extends Component {
    constructor(props) {
        super(props);
        this.state = {
            inputValue: '',
            list: []
        }
    }
    render() {
        return (
            <Fragment>
                <input
                    value={this.state.inputValue}
                    onChange={this.handleInputChange.bind(this)}
                />
                <button
                    onClick={this.handleBtnClick.bind(this)}
                >
                    提交
                </button>
                <ul>
                    {
                        this.state.list.map((item, index)=>{
                            return (
                                <TodoItem />
                            )
                        })
                    }
                </ul>
            </Fragment>
        )
    }
    handleInputChange(e) {
        this.setState({
            inputValue: e.target.value,
        })
    }

    handleBtnClick() {
        this.setState({
            list: [...this.state.list, this.state.inputValue],
            inputValue: '',
        })
    }
}

export default TodoList;
此时每次点击页面提交都会增加一个TodoItem字符串。
- React父组件使用属性的方式给子组件传值。子组件使用
this.props.属性名使用:
import React, { Component } from 'react';

class TodoItem extends Component {
    render() {
        return (
            <li>{this.props.content}</li>
        )
    }
}

export default TodoItem;
import React, {Component, Fragment} from 'react';
import TodoItem from './TodoItem';

class TodoList extends Component {
    constructor(props) {
        super(props);
        this.state = {
            inputValue: '',
            list: []
        }
    }
    render() {
        return (
            <Fragment>
                <input
                    value={this.state.inputValue}
                    onChange={this.handleInputChange.bind(this)}
                />
                <button
                    onClick={this.handleBtnClick.bind(this)}
                >
                    提交
                </button>
                <ul>
                    {
                        this.state.list.map((item, index)=>{
                            return (
                                // 把item以属性名为content的属性传递给TodoItem组件
                                // 子组件通过this.props.content使用
                                <TodoItem content={item} key={index}/>
                            )
                        })
                    }
                </ul>
            </Fragment>
        )
    }
    handleInputChange(e) {
        this.setState({
            inputValue: e.target.value,
        })
    }

    handleBtnClick() {
        this.setState({
            list: [...this.state.list, this.state.inputValue],
            inputValue: '',
        })
    }
}

export default TodoList;
此时新增功能已经完成。
-
为使点击列表项时可以将其删除,需要给其添加点击事件。这里需要注意的是,不能在父组件使用子组件的属性上绑定点击事件,而是要在子组件的元素上绑定。
React父组件通过属性形式给子组件传值,但子组件不能改变传过来的值(单向数据流)。
要想删除点击的列表项,需要操作父组件中的list数据,而子组件是无法操作父组件数据的,因此,要以方法调用的方式实现。如何让子组件调用父组件的方法,同属性传递一样,父组件将方法传递给子组件,这样实现子组件调用父组件方法的效果。为使子组件能把点击列表项的下标传给父组件,父组件需要在使用子组件时将index也传给子组件。
import React, { Component } from 'react';

class TodoItem extends Component {
    render() {
        return (
            <li
                onClick={this.handleItemDelete.bind(this)}
            >
                {this.props.content}
            </li>
        )
    }

    handleItemDelete() {
        this.props.handleDelete(this.props.index);
    }
}

export default TodoItem;
import React, {Component, Fragment} from 'react';
import TodoItem from './TodoItem';

class TodoList extends Component {
    constructor(props) {
        super(props);
        this.state = {
            inputValue: '',
            list: []
        }
    }
    render() {
        return (
            <Fragment>
                <input
                    value={this.state.inputValue}
                    onChange={this.handleInputChange.bind(this)}
                />
                <button
                    onClick={this.handleBtnClick.bind(this)}
                >
                    提交
                </button>
                <ul>
                    {
                        this.state.list.map((item, index)=>{
                            return (
                                <TodoItem
                                    content={item}
                                    key={index}
                                    index={index}
                                    handleDelete={this.handleItemDelete.bind(this)}
                                />
                            )
                        })
                    }
                </ul>
            </Fragment>
        )
    }
    handleInputChange(e) {
        this.setState({
            inputValue: e.target.value,
        })
    }

    handleBtnClick() {
        this.setState({
            list: [...this.state.list, this.state.inputValue],
            inputValue: '',
        })
    }

    handleItemDelete(index) {
        const list = [...this.state.list];
        list.splice(index, 1);
        this.setState({
            list: list
        })
    }
}

export default TodoList;
- 代码优化:
import React, { Component } from 'react';

class TodoItem extends Component {
    constructor(props) {
        super(props);
        // 统一将需要绑定this的函数定义到构造器内
        this.handleItemDelete = this.handleItemDelete.bind(this);
    }
    render() {
        // 解构赋值优化代码
        const {content} = this.props;
        return (
            <li
                onClick={this.handleItemDelete}
            >
                {content}
            </li>
        )
    }

    handleItemDelete() {
        const { handleDelete, index } = this.props;
        handleDelete(index);
    }
}

export default TodoItem;
import React, {Component, Fragment} from 'react';
import TodoItem from './TodoItem';

class TodoList extends Component {
    constructor(props) {
        super(props);
        this.state = {
            inputValue: '',
            list: []
        };
        this.handleInputChange = this.handleInputChange.bind(this);
        this.handleBtnClick = this.handleBtnClick.bind(this);
        this.handleItemDelete = this.handleItemDelete.bind(this);
    }
    render() {
        return (
            <Fragment>
                <input
                    value={this.state.inputValue}
                    onChange={this.handleInputChange}
                />
                <button
                    onClick={this.handleBtnClick}
                >
                    提交
                </button>
                <ul>
                    {this.getTodoItem()}
                </ul>
            </Fragment>
        )
    }

    // 遍历数组的逻辑放在单独的方法内
    getTodoItem() {
        return this.state.list.map((item, index)=>{
            return (
                <TodoItem
                    content={item}
                    key={index}
                    index={index}
                    handleDelete={this.handleItemDelete}
                />
            )
        })
    }

    handleInputChange(e) {
        /*this.setState({
            inputValue: e.target.value,
        })*/
        // 新版写法。
        const value = e.target.value;
        this.setState(()=>({
            inputValue: value
        }))
      	// 直接返回时可以省略return用()返回内容,完整写法如下:
        // const value = e.target.value;
        // this.setState(()=>{
        //     return {
        //         inputValue: value
        //     }
        // })
    }

    handleBtnClick() {
        // 这里会接受一个prevState,等价于this.state
        this.setState((prevState)=>({
            list: [...prevState.list, prevState.inputValue],
            inputValue: '',
        }))
        /*this.setState({
            list: [...this.state.list, this.state.inputValue],
            inputValue: '',
        })*/
    }

    handleItemDelete(index) {
        this.setState((prevState)=>{
            const list = [...prevState.list];
            list.splice(index, 1)
            // list: list可以简写为list
            return {list}
        })
    }
}

export default TodoList;