0. 介绍
Flume is a distributed, reliable, and available service for efficiently collecting, aggregating, and moving large amounts of log data. It has a simple and flexible architecture based on streaming data flows. It is robust and fault tolerant with tunable reliability mechanisms and many failover and recovery mechanisms. It uses a simple extensible data model that allows for online analytic application.
- 概述:
Flume 是 Cloudera 提供的一个高可用、高可靠、分布式的海量日志采集、聚合和传输的软件。
Flume 的核心是把数据从数据源(source)收集过来,再将收集到的数据送到 指定的目的地(sink)。为了保证输送的过程一定成功,在送到目的地(sink)之前,会先缓存数据(channel),待数据真正到达目的地(sink)后,flume 再删除自己缓存的数据。
Flume 支持定制各类数据发送方,用于收集各类型数据;同时,Flume 支持定制各种数据接受方,用于最终存储数据。一般的采集需求,通过对 flume 的简单配置即可实现。针对特殊场景也具备良好的自定义扩展能力。因此,flume 可以适用于大部分的日常数据采集场景。
- 运行机制:
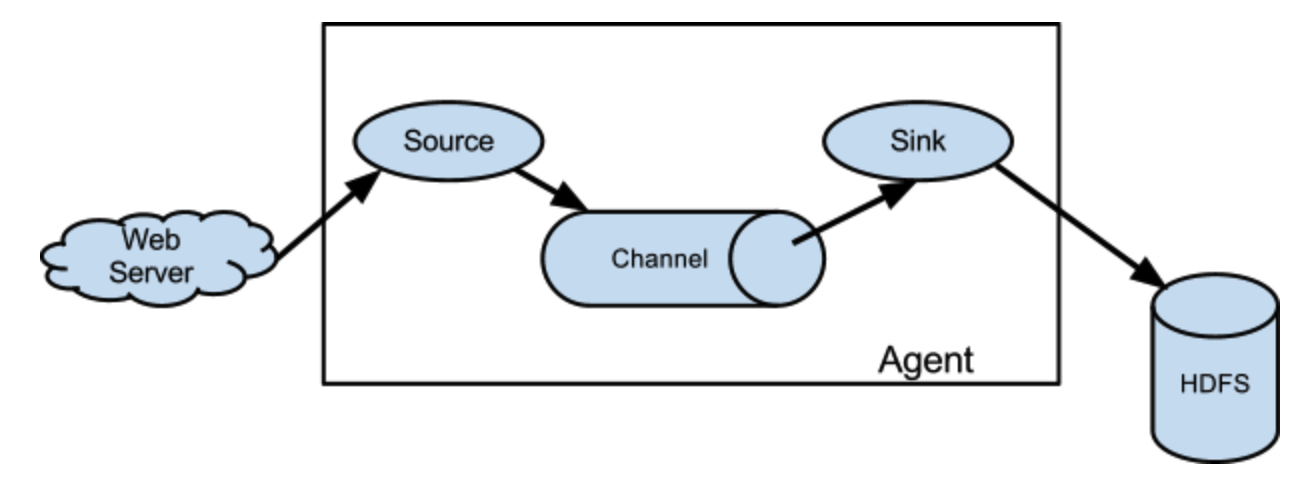
Flume 系统中核心的角色是 agent,agent 本身是一个 Java 进程,一般运行在日志收集节点。每一个 agent 相当于一个数据传递员,内部有三个组件:
- Source:采集源,用于跟数据源对接,以获取数据;
- Sink:下沉地,采集数据的传送目的,用于往下一级 agent 传递数据或者往最终存储系统传递数据;
- Channel:agent 内部的数据传输通道,用于从 source 将数据传递到 sink;
在整个数据的传输的过程中,流动的是 event,它是 Flume 内部数据传输的最基本单元。event 将传输的数据进行封装。如果是文本文件,通常是一行记录。event 也是事务的基本单位。event 从source流向channel,再到 sink,本身为一个字节数组,并可携带 headers(头信息)。event 代表着一个数据的最小完整单元,从外部数据源来,向外部的目的地去。
一个完整的 event 包括:event headers、event body、event 信息,其中event 信息就是 flume 收集到的日记记录。
- Flume结构图
单一结构:
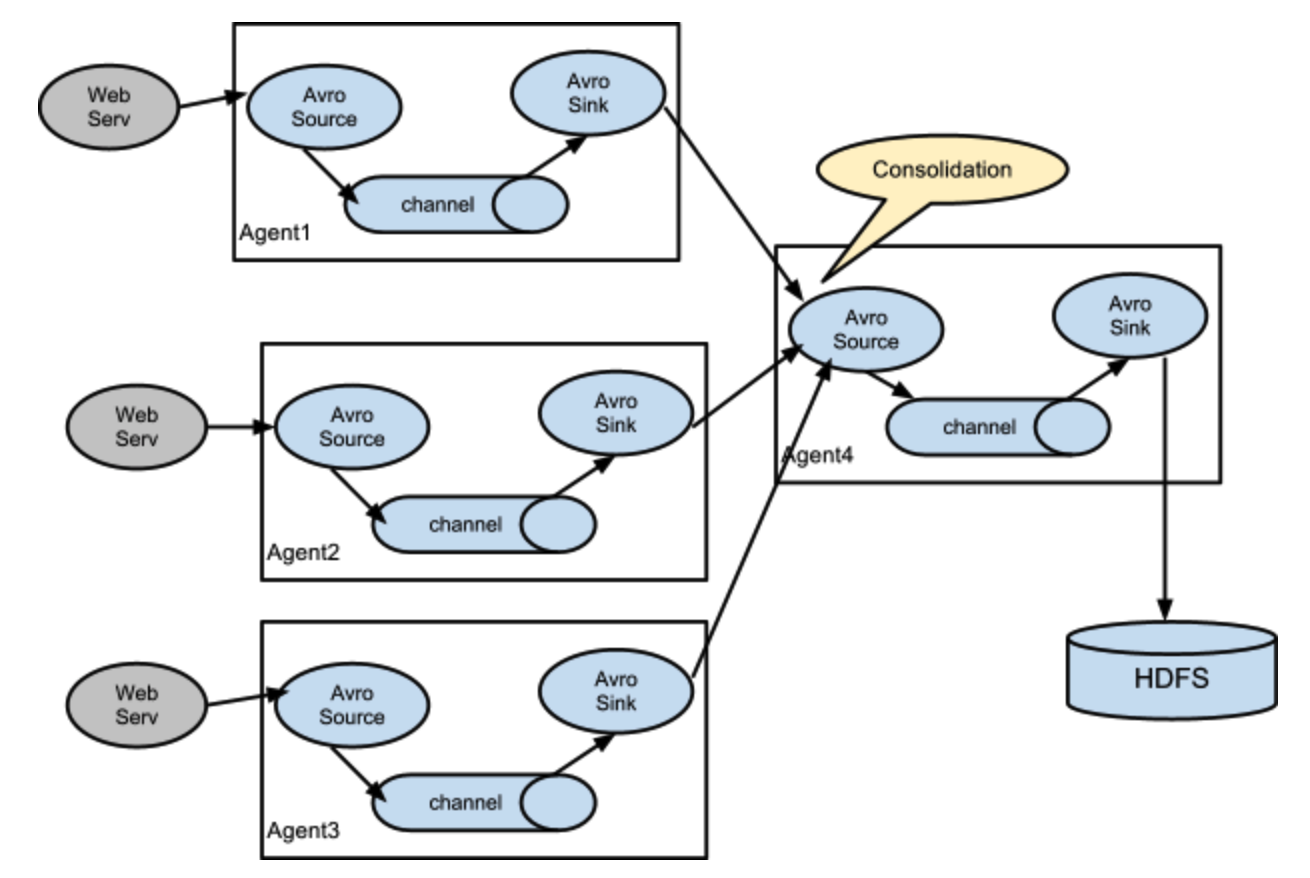
复杂结构:
1. 安装
Flume安装较为简单,下载安装包解压到目标机,配置JAVA_HOME即可。
下载:这里使用apache-flume-1.9.0-bin.tar.gz;
安装:
# 解压文件
tar -zxvf apache-flume-1.9.0-bin.tar.gz -C ~
# 重命名为flume
mv apache-flume-1.9.0-bin/ flume
# 删除安装包
配置:
# 复制模版配置文件
cp flume-env.sh.template flume-env.sh

# 配置JAVA_HOME
2. 案例
使用Flume的核心就是采集方案的配置,即通过配置文件对Flume的三个组件进行配置。
2.1 入门案例
以官网案例为例,实现一个从本地网络端口到控制台的信息采集。
创建配置文件(位置随意,这里为conf/netcat-logger.conf):
# example.conf: A single-node Flume configuration

# Name the components on this agent
a1.sources = r1
a1.sinks = k1
a1.channels = c1

# Describe/configure the source
a1.sources.r1.type = netcat
a1.sources.r1.bind = localhost
a1.sources.r1.port = 44444

# Describe the sink
a1.sinks.k1.type = logger

# Use a channel which buffers events in memory
a1.channels.c1.type = memory
# 默认该通道中最大的可以存储的 event 数量
a1.channels.c1.capacity = 1000
# 每次最大可以从 source 中拿到或者送到 sink 中的 event 数量
a1.channels.c1.transactionCapacity = 100

# Bind the source and sink to the channel
a1.sources.r1.channels = c1
a1.sinks.k1.channel = c1  # 注意这里是1对1,channel不是channels
启动Flume:
$: bin/flume-ng agent --conf conf --conf-file conf/netcat-logger.conf --name a1 -Dflume.root.logger=INFO,console
使用telnet测试:
gp@node-1:~$ telnet 127.0.0.1 44444
Trying 127.0.0.1...
Connected to 127.0.0.1.
Escape character is '^]'.
hello world  # 输入hello world回车
OK
控制台:
2020-04-20 15:07:09,834 (SinkRunner-PollingRunner-DefaultSinkProcessor) [INFO - org.apache.flume.sink.LoggerSink.process(LoggerSink.java:95)] Event: { headers:{} body: 68 65 6C 6C 6F 20 77 6F 72 6C 64 0D hello world. }
2.2 采集目录到HDFS
需求:某特定目录下会不断产生文件,现要每当有新文件出现就采集到hdfs。
- source:spooldir;
- sink:hdfs sink;
- channel:文件channel或内存channel;
spooldir-hdfs.conf:
# Name the components on this agent
a1.sources = r1
a1.sinks = k1
a1.channels = c1

# Describe/configure the source
# 注意:不能往监控目中重复丢同名文件。否则flume异常,停止工作
a1.sources.r1.type = spooldir
a1.sources.r1.spoolDir = /home/gp/logs  # 目录要提前创建,否则启动报错
a1.sources.r1.fileHeader = true

# Describe the sink
a1.sinks.k1.type = hdfs
a1.sinks.k1.hdfs.path = /flume/events/%y-%m-%d/%H%M/
a1.sinks.k1.hdfs.filePrefix = events-
# 每10分钟的文件保存在同一个目录下
a1.sinks.k1.hdfs.round = true
a1.sinks.k1.hdfs.roundValue = 10
a1.sinks.k1.hdfs.roundUnit = minute
# 临时文件写入hdfs文件限制,满足任何一个就写入文件
a1.sinks.k1.hdfs.rollInterval = 3
a1.sinks.k1.hdfs.rollSize = 20
a1.sinks.k1.hdfs.rollCount = 5
a1.sinks.k1.hdfs.batchSize = 1
a1.sinks.k1.hdfs.useLocalTimeStamp = true

# 生成的文件类型,默认是 Sequencefile,可用 DataStream,普通文本
a1.sinks.k1.hdfs.fileType = DataStream

# Use a channel which buffers events in memory
a1.channels.c1.type = memory
a1.channels.c1.capacity = 1000
a1.channels.c1.transactionCapacity = 100

# Bind the source and sink to the channel
a1.sources.r1.channels = c1
a1.sinks.k1.channel = c1
启动:
$: bin/flume-ng agent -c conf -f conf/spooldir-hdfs.conf -n a1 -Dflume.root.logger=INFO,console
测试:
$: cp 1.txt logs/
报错:
2020-04-21 15:52:32,881 (pool-3-thread-1) [INFO - org.apache.flume.client.avro.ReliableSpoolingFileEventReader.readEvents(ReliableSpoolingFileEventReader.java:384)] Last read took us just up to a file boundary. Rolling to the next file, if there is one.
2020-04-21 15:52:32,882 (pool-3-thread-1) [INFO - org.apache.flume.client.avro.ReliableSpoolingFileEventReader.rollCurrentFile(ReliableSpoolingFileEventReader.java:497)] Preparing to move file /home/gp/logs/2.txt to /home/gp/logs/2.txt.COMPLETED
2020-04-21 15:52:32,920 (SinkRunner-PollingRunner-DefaultSinkProcessor) [INFO - org.apache.flume.sink.hdfs.HDFSDataStream.configure(HDFSDataStream.java:57)] Serializer = TEXT, UseRawLocalFileSystem = false
2020-04-21 15:52:33,002 (SinkRunner-PollingRunner-DefaultSinkProcessor) [ERROR - org.apache.flume.sink.hdfs.HDFSEventSink.process(HDFSEventSink.java:459)] process failed
java.lang.NoSuchMethodError: com.google.common.base.Preconditions.checkArgument(ZLjava/lang/String;Ljava/lang/Object;)V
	at org.apache.hadoop.conf.Configuration.set(Configuration.java:1357)
	at org.apache.hadoop.conf.Configuration.set(Configuration.java:1338)
	at org.apache.hadoop.conf.Configuration.setBoolean(Configuration.java:1679)
	at org.apache.flume.sink.hdfs.BucketWriter.open(BucketWriter.java:221)
	at org.apache.flume.sink.hdfs.BucketWriter.append(BucketWriter.java:572)
	at org.apache.flume.sink.hdfs.HDFSEventSink.process(HDFSEventSink.java:412)
	at org.apache.flume.sink.DefaultSinkProcessor.process(DefaultSinkProcessor.java:67)
	at org.apache.flume.SinkRunner$PollingRunner.run(SinkRunner.java:145)
	at java.lang.Thread.run(Thread.java:745)
Exception in thread "SinkRunner-PollingRunner-DefaultSinkProcessor" java.lang.NoSuchMethodError: com.google.common.base.Preconditions.checkArgument(ZLjava/lang/String;Ljava/lang/Object;)V
	at org.apache.hadoop.conf.Configuration.set(Configuration.java:1357)
	at org.apache.hadoop.conf.Configuration.set(Configuration.java:1338)
	at org.apache.hadoop.conf.Configuration.setBoolean(Configuration.java:1679)
	at org.apache.flume.sink.hdfs.BucketWriter.open(BucketWriter.java:221)
	at org.apache.flume.sink.hdfs.BucketWriter.append(BucketWriter.java:572)
	at org.apache.flume.sink.hdfs.HDFSEventSink.process(HDFSEventSink.java:412)
	at org.apache.flume.sink.DefaultSinkProcessor.process(DefaultSinkProcessor.java:67)
	at org.apache.flume.SinkRunner$PollingRunner.run(SinkRunner.java:145)
	at java.lang.Thread.run(Thread.java:745)
原因:jar包冲突(guava*.jar)。
解决:将Flume中jar包删除,拷贝Hadoop中jar包到对应目录,重新启动Flume即可正常运行。
$: rm -rf ~/flume/lib/guava-11.0.2.jar
$: cp ~/hadoop-3.2.1/share/hadoop/common/lib/guava-27.0-jre.jar ~/flume/lib
结果:
gp@node-1:~$ hadoop fs -ls /flume/events/20-04-21/1540
Found 2 items
-rw-r--r--   2 gp supergroup         23 2020-04-21 15:43 /flume/events/20-04-21/1540/events-.1587455027027
-rw-r--r--   2 gp supergroup         36 2020-04-21 15:43 /flume/events/20-04-21/1540/events-.1587455027028
gp@node-1:~$ hadoop fs -cat /flume/events/20-04-21/1540/events-.1587455027027
2020-04-21 15:59:04,858 INFO sasl.SaslDataTransferClient: SASL encryption trust check: localHostTrusted = false, remoteHostTrusted = false
hello world java hello
gp@node-1:~$ hadoop fs -cat /flume/events/20-04-21/1540/events-.1587455027028
2020-04-21 15:59:11,319 INFO sasl.SaslDataTransferClient: SASL encryption trust check: localHostTrusted = false, remoteHostTrusted = false
python scala spark
world java react
2.3 采集文件到HDFS
需求:如将某服务器下源源不断产生的日志(追加日志)采集到hdfs。
- source:exec ‘tail -F file’;
- sink:hdfs sink;
- channel:memory channel;
tail-hdfs.conf:
# Name the components on this agent
a1.sources = r1
a1.sinks = k1
a1.channels = c1

# Describe/configure the source
a1.sources.r1.type = exec
a1.sources.r1.command = tail -F /home/gp/logs/test.log
a1.sources.r1.channels = c1

# Describe the sink
a1.sinks.k1.type = hdfs
a1.sinks.k1.hdfs.path = /flume/tailout/%y-%m-%d/%H%M/
a1.sinks.k1.hdfs.filePrefix = events-
a1.sinks.k1.hdfs.round = true
a1.sinks.k1.hdfs.roundValue = 10
a1.sinks.k1.hdfs.roundUnit = minute
a1.sinks.k1.hdfs.rollInterval = 3
a1.sinks.k1.hdfs.rollSize = 20
a1.sinks.k1.hdfs.rollCount = 5
a1.sinks.k1.hdfs.batchSize = 1
a1.sinks.k1.hdfs.useLocalTimeStamp = true

#生成的文件类型,默认是 Sequencefile,可用 DataStream,则为普通文本
a1.sinks.k1.hdfs.fileType = DataStream

# Use a channel which buffers events in memory
a1.channels.c1.type = memory
a1.channels.c1.capacity = 1000
a1.channels.c1.transactionCapacity = 100

# Bind the source and sink to the channel
a1.sources.r1.channels = c1
a1.sinks.k1.channel = c1
启动:
$: bin/flume-ng agent -c conf -f conf/tail-hdfs.conf -n a1 -Dflume.root.logger=INFO,console
模拟日志产生:
$: while true; do echo 'access access ... ' >> /home/gp/logs/test.log; sleep 0.5; done
参数解析:
-
rollInterval:默认值30, hdfs sink 间隔多长将临时文件滚动成最终目标文件,单位秒。如果设置成 0,则表示不根据时间来滚动文件;
注:滚动(roll)指的是,hdfs sink 将临时文件重命名成最终目标文件,并新打开一个临时文件来写入数据;
-
rollSize:默认值1024,当临时文件达到该大小(单位:bytes)时,滚动成目标文件。如果设置成 0,则表示不根据临时文件大小来滚动文件;
-
rollCount:默认值10,当 events 数据达到该数量时候,将临时文件滚动成目标文件。如果设置成 0,则表示不根据 events 数据来滚动文件;
-
round:默认值false,是否启用时间上的”舍弃”,这里的”舍弃”,类似于”四舍五入”;
-
roundValue:默认值1,时间上进行”舍弃”的值;
-
roundUnit:默认值seconds,时间上进行”舍弃”的单位,包含second、minute、hour;
round*:即每隔多久生成一个新目录。
3. 负载均衡
当一台机器(一个进程)无法满足所有请求时,可以使用多个Flume进程组成复杂结构,实现负载均衡。简单结构图如:
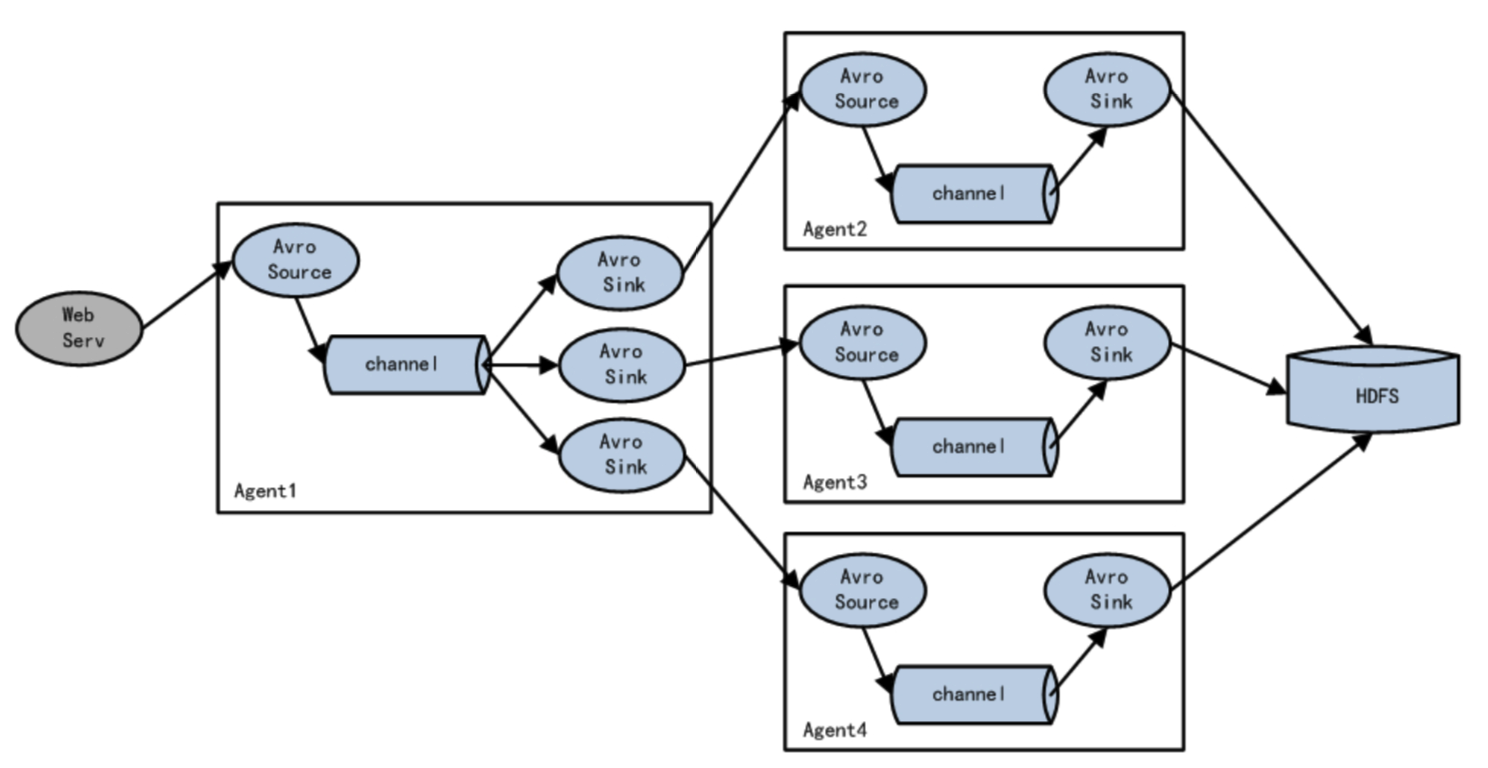
其中Agent1 是一个路由节点,负责将 Channel 暂存的 Event 均衡到对应的多个 Sink组件上,而每个 Sink 组件分别连接到一个独立的 Agent 上。Avro是RPC的跨网络传输协议。
这里使用node-1作为Agent1,node-2和node-3作为Agent2和Agent3。首先将flume拷贝至node-2和node3:
$: scp -r flume/ gp@node-2:~
$: scp -r flume/ gp@node-3:~
Agent1采集方案(exec-avro.conf):
# name agent1
agent1.channels = c1
agent1.sources = r1
agent1.sinks = k1 k2

# set group
agent1.sinkgroup = g1

# set channel
agent1.channels.c1.type = memory
agent1.channels.c1.capacity = 1000
agent1.channels.c1.transactionCapacity = 100

agent1.sources.r1.channels = c1
agent1.sources.r1.type = exec
agent1.sources.r1.command = tail -F /home/gp/logs/123.log

# set sink1
agent1.sinks.k1.channel = c1
agent1.sinks.k1.type = avro
agent1.sinks.k1.hostname = node-2
agent1.sinks.k1.port = 52020

# set sink2
agent1.sinks.k2.channel = c1
agent1.sinks.k2.type = avro
agent1.sinks.k2.hostname = node-3
agent1.sinks.k2.port = 52020

# set sink group
agent1.sinkgroups.g1.sinks = k1 k2

# set load_balance
agent1.sinkgroups.g1.processor.type = load_balance
agent1.sinkgroups.g1.processor.backoff = true  # 开启黑名单
agent1.sinkgroups.g1.processor.selector = round_robin  # 轮询,还可以为random
agent1.sinkgroups.g1.processor.selector.maxTimeOut = 10000  # 黑名单"惩罚"时长
Agent2/Agent3采集方案(avro-logger.conf):
# Name the components on this agent
a1.sources = r1
a1.sinks = k1
a1.channels = c1

# Describe/configure the source
a1.sources.r1.type = avro
a1.sources.r1.channels = c1
a1.sources.r1.bind = node-2  # Agent3中这里为node-3
a1.sources.r1.port = 52020

# Describe the sink
a1.sinks.k1.type = logger

# Use a channel which buffers events in memory
a1.channels.c1.type = memory
a1.channels.c1.capacity = 1000
a1.channels.c1.transactionCapacity = 100

# Bind the source and sink to the channel
a1.sources.r1.channels = c1
a1.sinks.k1.channel = c1
启动Agent2/Agent3:
$: bin/flume-ng agent -c conf -f conf/avro-logger.conf -n a1 -Dflume.root.logger=INFO,console
启动Agent1:
$: bin/flume-ng agent -c conf -f conf/exec-avro.conf -n agent1 -Dflume.root.logger=INFO,console
模拟日志:
$: while true; do echo 'access ...' >> /home/gp/logs/123.log; sleep 3; done
4. Failover
Failover(容错)主要体现在多级架构中,架构和负载均衡架构类似。不同的是,负载均衡是多个Agent按照某种规则共同消费上级events。而容错机制则只有一个Agent干活,只不过当某个Agent无法工作时,会有另一个顶上来。
Failover Sink Processor 维护一个优先级 Sink 组件列表,只要有一个 Sink 组件可用,Event 就被传递到下一个组件。故障转移机制的作用是将失败的 Sink 降级到一个池,在这些池中它们被分配一个冷却时间,随着故障的连续,在重试之前冷却时间增加。一旦 Sink 成功发送一个事件,它将恢复到活动池。 Sink 具有与之相关的优先级,数量越大,优先级越高。
例如,具有优先级为 100 的 sink 在优先级为 80 的 Sink 之前被激活。如果在发送事件时汇聚失败,则接下来将尝试下一个具有最高优先级的 Sink 发送事件。如果没有指定优先级,则根据在配置中指定 Sink 的顺序来确定优先级。
Agent1采集方案(exec-avro.conf):
# name agent1
agent1.channels = c1
agent1.sources = r1
agent1.sinks = k1 k2

# set group
agent1.sinkgroup = g1

# set channel
agent1.channels.c1.type = memory
agent1.channels.c1.capacity = 1000
agent1.channels.c1.transactionCapacity = 100

agent1.sources.r1.channels = c1
agent1.sources.r1.type = exec
agent1.sources.r1.command = tail -F /home/gp/logs/123.log

# set sink1
agent1.sinks.k1.channel = c1
agent1.sinks.k1.type = avro
agent1.sinks.k1.hostname = node-2
agent1.sinks.k1.port = 52020

# set sink2
agent1.sinks.k2.channel = c1
agent1.sinks.k2.type = avro
agent1.sinks.k2.hostname = node-3
agent1.sinks.k2.port = 52020

# set sink group
agent1.sinkgroups.g1.sinks = k1 k2

# set failover
agent1.sinkgroups.g1.processor.type = failover
agent1.sinkgroups.g1.processor.priority.k1 = 10  # 设置优先级
agent1.sinkgroups.g1.processor.priority.k2 = 1
agent1.sinkgroups.g1.processor.maxpenalty = 10000  # 冷却时长
Agent2/Agent3采集方案(avro-logger.conf):
# Name the components on this agent
a1.sources = r1
a1.sinks = k1
a1.channels = c1

# Describe/configure the source
a1.sources.r1.type = avro
a1.sources.r1.channels = c1
a1.sources.r1.bind = node-2  # Agent3中这里为node-3
a1.sources.r1.port = 52020

# Describe the sink
a1.sinks.k1.type = logger

# Use a channel which buffers events in memory
a1.channels.c1.type = memory
a1.channels.c1.capacity = 1000
a1.channels.c1.transactionCapacity = 100

# Bind the source and sink to the channel
a1.sources.r1.channels = c1
a1.sinks.k1.channel = c1
5. 拦截器
Flume 是 Cloudera 提供的一个高可用的,高可靠的,分布式的海量日志采集、聚合和传输的系统,Flume 支持在日志系统中定制各类数据发送方,用于收集数据。同时,Flume 提供对数据进行简单处理,并写到各种数据接受方(可定制)的能力。
Flume 有各种自带的拦截器,比如TimestampInterceptor、 HostInterceptor、RegexExtractorInterceptor 等,通过使用不同的拦截器,实现不同的功能。但是以上的这些拦截器,不能改变原有日志数据的内容或者对日志信息添加一定的处理逻辑,当一条日志信息有几十个甚至上百个字段的时候,在传统的 Flume 处理下,收集到的日志还是会有对应这么多的字段,也不能对想要的字段进行对应的处理。
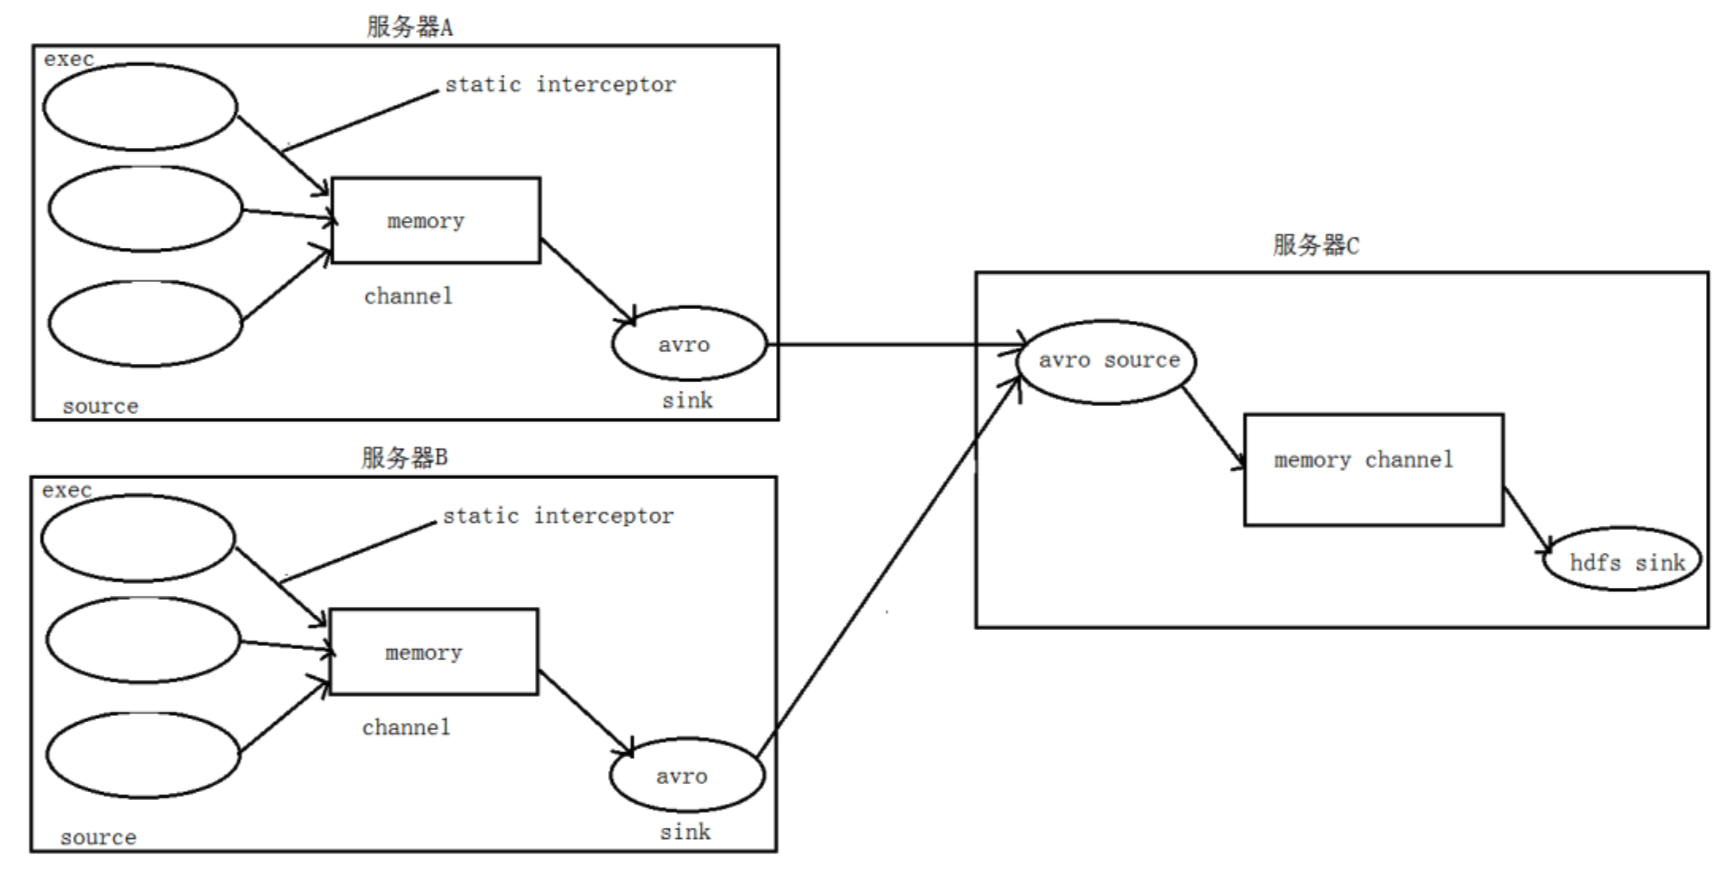
需求:假设有A、B 两台日志服务机器实时生产日志主要类型为 access.log、nginx.log、 web.log 。
现在要求把A、B 机器中的access.log、nginx.log、web.log 采集汇总到C机器上 然后统一收集到 hdfs 中。 但是在 hdfs 中要求的目录为:
- /source/logs/access/20160101/**
- /source/logs/nginx/20160101/**
- /source/logs/web/20160101/**
流程分析:
实现:
在服务器A和服务器B上创建配置文件(exec_source_avro_sink.conf):
# Name the components on this agent
a1.sources = r1 r2 r3
a1.sinks = k1
a1.channels = c1

# Describe/configure the source
a1.sources.r1.type = exec
a1.sources.r1.command = tail -F /root/data/access.log
a1.sources.r1.interceptors = i1
a1.sources.r1.interceptors.i1.type = static
# static 拦截器的功能就是往采集到的数据的 header 中插入自己定义的 key-value 对
a1.sources.r1.interceptors.i1.key = type
a1.sources.r1.interceptors.i1.value = access

a1.sources.r2.type = exec
a1.sources.r2.command = tail -F /root/data/nginx.log
a1.sources.r2.interceptors = i2
a1.sources.r2.interceptors.i2.type = static
a1.sources.r2.interceptors.i2.key = type
a1.sources.r2.interceptors.i2.value = nginx

a1.sources.r3.type = exec
a1.sources.r3.command = tail -F /root/data/web.log
a1.sources.r3.interceptors = i3
a1.sources.r3.interceptors.i3.type = static
a1.sources.r3.interceptors.i3.key = type
a1.sources.r3.interceptors.i3.value = web

# Describe the sink
a1.sinks.k1.type = avro
a1.sinks.k1.hostname = 192.168.200.101
a1.sinks.k1.port = 41414

# Use a channel which buffers events in memory
a1.channels.c1.type = memory
a1.channels.c1.capacity = 20000
a1.channels.c1.transactionCapacity = 10000

# Bind the source and sink to the channel
a1.sources.r1.channels = c1
a1.sources.r2.channels = c1
a1.sources.r3.channels = c1
a1.sinks.k1.channel = c1
在服务器 C 上创建配置文件(avro_source_hdfs_sink.conf):
#定义 agent 名, source、channel、sink 的名称
a1.sources = r1
a1.sinks = k1
a1.channels = c1

#定义 source
a1.sources.r1.type = avro
a1.sources.r1.bind = 192.168.200.101
a1.sources.r1.port =41414
#添加时间拦截器
a1.sources.r1.interceptors = i1
a1.sources.r1.interceptors.i1.type = org.apache.flume.interceptor.TimestampInterceptor$Builder

#定义 channels
a1.channels.c1.type = memory
a1.channels.c1.capacity = 20000
a1.channels.c1.transactionCapacity = 10000

#定义 sink
a1.sinks.k1.type = hdfs
a1.sinks.k1.hdfs.path=hdfs://192.168.200.101:9000/source/logs/%{ty pe}/%Y%m%d
a1.sinks.k1.hdfs.filePrefix = events
a1.sinks.k1.hdfs.fileType = DataStream
a1.sinks.k1.hdfs.writeFormat = Text
#时间类型
a1.sinks.k1.hdfs.useLocalTimeStamp = true #生成的文件不按条数生成
a1.sinks.k1.hdfs.rollCount = 0
#生成的文件按时间生成
a1.sinks.k1.hdfs.rollInterval = 30
#生成的文件按大小生成
a1.sinks.k1.hdfs.rollSize = 10485760
#批量写入 hdfs 的个数
a1.sinks.k1.hdfs.batchSize = 10000
# flume 操作 hdfs 的线程数(包括新建,写入等)
a1.sinks.k1.hdfs.threadsPoolSize=10
#操作 hdfs 超时时间
a1.sinks.k1.hdfs.callTimeout=30000

#组装 source、channel、sink
a1.sources.r1.channels = c1
a1.sinks.k1.channel = c1
启动C,启动A、B。
Flume支持自定义拦截器,要实现 Interceptor 接口。打包后放至flume/lib下。配置文件如:
a1.channels = c1
a1.sources = r1
a1.sinks = s1

#channel
a1.channels.c1.type = memory
a1.channels.c1.capacity=100000
a1.channels.c1.transactionCapacity=50000
#source
a1.sources.r1.channels = c1
a1.sources.r1.type = spooldir
a1.sources.r1.spoolDir = /root/data/
a1.sources.r1.batchSize= 50
a1.sources.r1.inputCharset = UTF-8
a1.sources.r1.interceptors =i1 i2
a1.sources.r1.interceptors.i1.type = cn.adoredu.interceptor.CustomParameterInterceptor$Builder
# 下面配置与具体业务相关
a1.sources.r1.interceptors.i1.fields_separator=\\u0009
a1.sources.r1.interceptors.i1.indexs =0,1,3,5,6
a1.sources.r1.interceptors.i1.indexs_separator =\\u002c
a1.sources.r1.interceptors.i1.encrypted_field_index =0
a1.sources.r1.interceptors.i2.type = org.apache.flume.interceptor.TimestampInterceptor$Builder
#sink
a1.sinks.s1.channel = c1
a1.sinks.s1.type = hdfs
a1.sinks.s1.hdfs.path =hdfs://192.168.200.101:9000/flume/%Y%m%d
a1.sinks.s1.hdfs.filePrefix = event
a1.sinks.s1.hdfs.fileSuffix = .log
a1.sinks.s1.hdfs.rollSize = 10485760
a1.sinks.s1.hdfs.rollInterval =20
a1.sinks.s1.hdfs.rollCount = 0
a1.sinks.s1.hdfs.batchSize = 1500
a1.sinks.s1.hdfs.round = true
a1.sinks.s1.hdfs.roundUnit = minute
a1.sinks.s1.hdfs.threadsPoolSize = 25
a1.sinks.s1.hdfs.useLocalTimeStamp = true
a1.sinks.s1.hdfs.minBlockReplicas = 1